Background
As my K40-S conversion matured I started to actually use the machine to make parts, mostly from acrylic.As I learned the nuances the optical subsystem I found areas for improvement and they are logged here.
For other information on the K40-S build use the K40-S BUILD INDEX with schematics
Donate:
Please consider donating (button to the right of this post).
Your donations help fund additional research, tools and parts that I will return to the community as information
Optical Path
Elements of the K40 optical path
- Laser
- #1 mirror
- #2 Mirror
- #3 Mirror
- #Objective lens
I also felt that some of the optical mounts were unstable and required to much effort to access them.
I decided that if I was to make improvements the optical path while making it easier to align then I needed to model the real system.
The model that I am working with is outlined in this post:
https://3dwarehouse.sketchup.com/model.html?id=385d6821-536b-413b-870e-5d4502ce1e0e
https://3dwarehouse.sketchup.com/model.html?id=385d6821-536b-413b-870e-5d4502ce1e0e
My goals for this activity are:
- Improve the stability of optical mounts
- Make alignment easier
- Design as much as possible so that it can be built by hand and laser in the shop
Laser Head Redesign
Old Hack
When I got the LO air assist I had to re-make the objective lens mounting plate to fit the LO objective lens mount. Later I also hacked in a:
- Finder LED
- Drag chain bracket
The hacked head was pretty ugly and because it had brackets stacked on top of each other it was hard to align. I also thought my drag chain bracket was marginal.
 |
| The ugly old heavily modified head |
The new design has:
- All plastic laminate construction for weight and stability
- More reliable and plugged connections to the finder.
- Azimuth screw adjustment on the finder laser, instead of bending a metal bracket
- Locking screw on finder laser.
- Integrated drag chain bracket.
- Requires about 2 hrs of manual shop time or laser cut capable.
- The large holes can be drilled using 1" and 3/4 inch forsner bits.


Laser Head
The model provided the ability to get key dimensions relative to the opto-mechanical components.
- Lense FL = 38.1 mm
- Distance to surface from head w/o assist cone installed
- Distance to surface from head with assist cone installed
 |
| Model of head |
#2 Mirror Stability Improvements
While running ramp tests I found that my #2 mirror would not hold its alignment.
I found a defect in the way it was manufactured. The adjustment screws each have a detent into which the screw is seated. These detents align the face frame that holds the lens. The upper left adjustment screws detent was improperly drilled allowing the screw to pop in and out of position, changing the mirrors alignment.
The solution was twofold.
- Re-drill the hole so the adjustment screw has a positive detent. Unfortunately the original hole was drilled only slightly off and the drill bit wanted to wander from the new hole position into the original hole. After disassembly I clamped the frame in a vise and first drilled a small pilot hole. Then carefully drilled using successively larger bits until the final which was 7/64".
- After reassembly I noticed that the outer frame was only held fast by the tension of the springs. I didn't like that design and wanted a more positive way to insure the mirror does not move under vibration. My solution was add a locking screw to the assembly to insure that the mirror frame cannot move once adjustment is made. I used a 4-40 Philips head screw and star washer.
- I think I found a way to make the mirror mount position adjustment, on the mirror bracket (underneath) accessible. To properly adjust I found that I had to remove the bracket, make the coarse adjustment and then reinstall multiple times to get the bracket in the center of its adjustment range and then do the fine adjustment from the topside using the brackets mounting screws. I added two thumbscrews that are accessible underneath with your fingers allowing you to loosen and adjust without having to use a screwdriver while blindly hunting the screw heads.
Underside Adjustment Modifications
Simple, just buy and install these thumbscrews :)https://www.mcmaster.com/#92581a120/=15upn2q
 |
| Before... |
 |
| After ..... |
Making the locking screw modification:
- Remove the lens
- Clamp the assy. in a drill vice
- Choose a bit sized for tapping whatever size screw you are installing. I used a 4-40 so the drill was #43. A #2-56 probably would be better.
- Drill the hole that is square to the surface in approx the position shown in the pictures below through the front and back frame. I drilled from the back side and I drilled with it fully assembled so the front and back frames were aligned. For me the location was .5" from the top left and .14 from the left edge. The position is not critical just insure that it does not interfere with the adjustment screws or the mirror retention face frame.
- Tap the hole in the rear frame. The screw will enter from the front and screw into the back plate. The front plate will not be threaded.
- In the front frame re-drill the hole to provide a liberal clearance hole for the screw size you are using. The intention is to insure that when the lock screw is loosened for adjustment that the frame does not bind on it.
- Install the locking screw and washer.
- Install the lens and its keeper.
- Reinstall in machine and align.
Note: I replaced the spring retaining pins with more robust dowel pins. I also fabricated a wrench to make tightening the adjustment screw nuts easier :).
Locking screw cams the frame out of alignment
Adding a plastic ferrule under the locking screw keeps it from cam-ing the frame when it is tightened and messing up the adjustment. I used a plastic spacer used to isolate screw when mounting PCB's. |
| Note plastic washer under the locking screw |
To adjust the mirror with the locking screw modification.
- Loosen the locking screw by backing the screw out to its limit
- Loosen the adjusting screw locking nuts
- Adjust the mirror using the three adjustment thumb screws until you get the beam placement you want.
- Snug the adjustment screw locking nuts, don't over tighten. The screw is intended to limit the travel of the frame not distort it or pull the frame off its adjustment screws. Notice if the mirror frame moves when you tighten the screw if it does back off.
- Recheck the beam position.
 |
| The detent was drilled to the right of the adjustment screw. This allowed the frame to move left-right in-out of the detent |
 |
| New detent, drilled next to the misplaced one. |
 |
| The locking screw hole, below the upper left adjustment screw |
 |
| Locking screw installed |
 |
| Cross section view of locking screw. Do not use lock washer as shown here! |
 |
| complete ass and wrench |

 |
| Seriously, adjustments under the bracket :( |
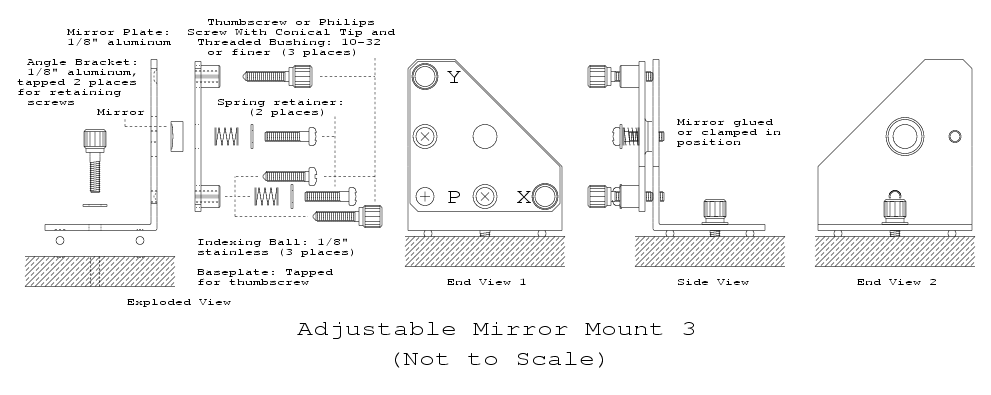
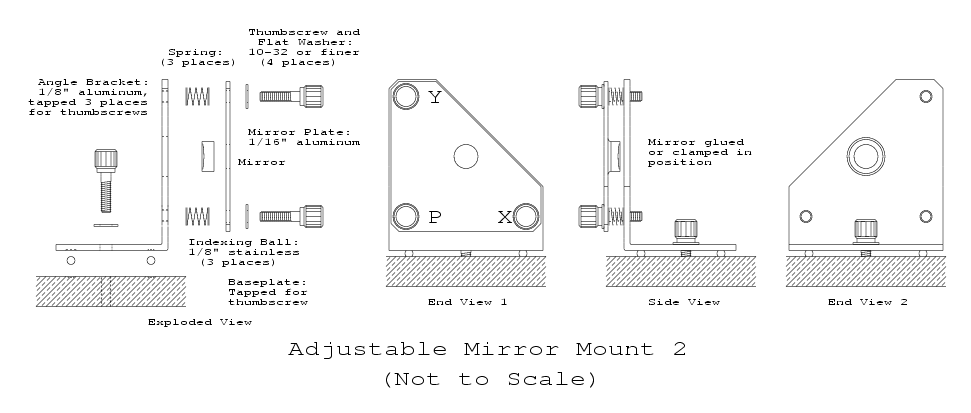
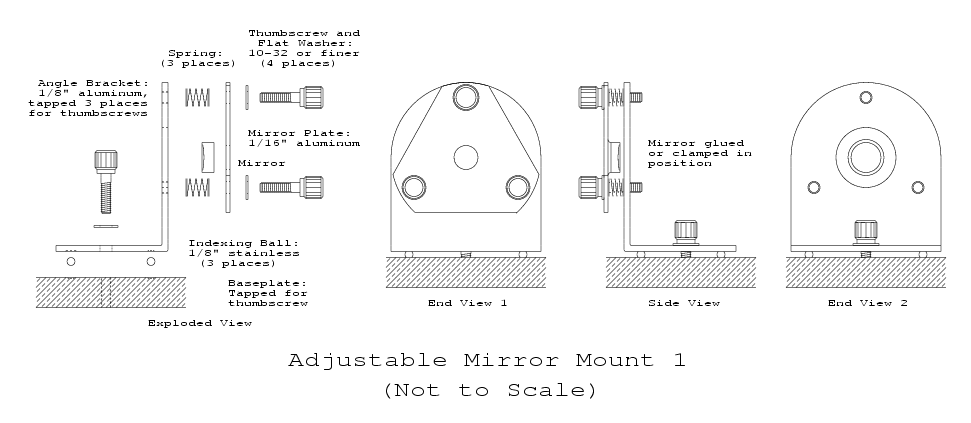
Mirror Mount Designs
https://www.repairfaq.org/sam/mmount3.gif
Enjoy be safe and comment
Maker Don
No comments:
Post a Comment