Background
The K40 bed is fixed and one quickly finds out that being able to vertically position the bed enables a much easier focus process when cutting and engraving objects of various thickness.I tinkered with building my own lift table and finally realized that that Light Objects lift table was less expensive than I could build myself. This table is used without these build instructions.
Two approaches are described.
- The lift function can be made to be stand alone as this post instructs: http://donsthings.blogspot.com/search?q=lift+table
- Integrate the lift table with the Smoothie which this post instructs.
This subsystem is added to the K40-S BUILD INDEX with schematics
Thanks to +Robert Rossi who collaborated and tested this build on his K40.
Thanks to +Robert Rossi who collaborated and tested this build on his K40.
Donate:
Please consider donating (button to the right of this post).
Your donations help fund additional research, tools and parts that I will return to the community as information and how-to's.
----------------------------------
Smoothie Integration
Integrating Smoothie with the Light Objects lift table is pretty straight forward.
Limit Switches
You will need to mechanically affix limit switches to the Light Objects lift table. Ideas for mounting the limit switches are included in the Standalone Lift table post. There is a link in this post to a bracket that can be laser cut.
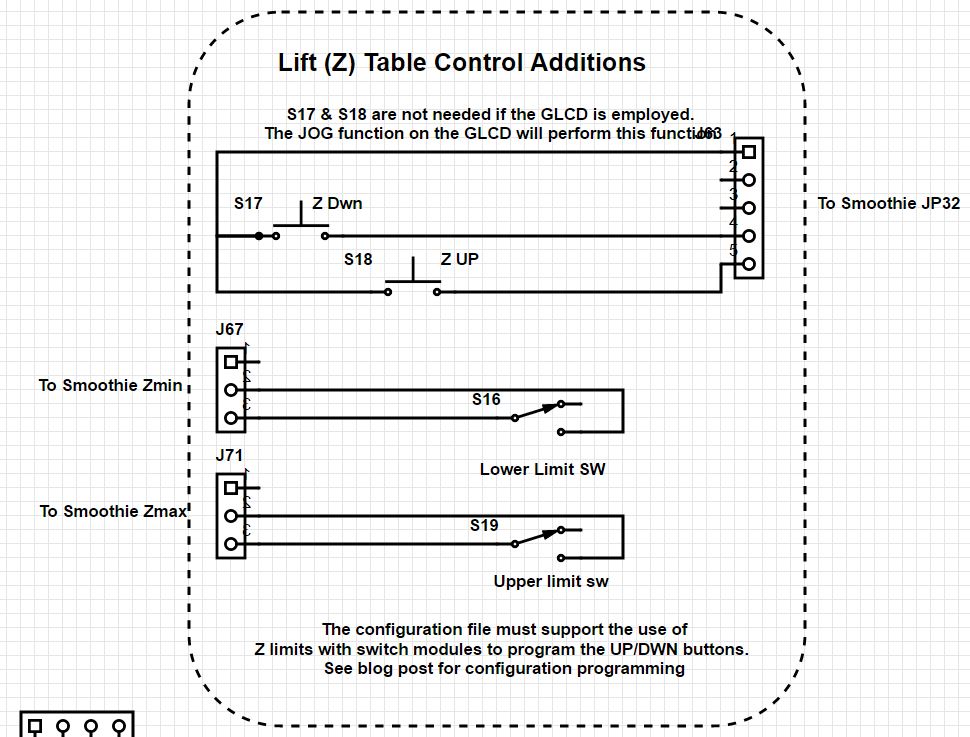
Wiring the limit switches
- Connect the lift tables limit switches to the Zmin and Zmax end-stop connections
- Configure the z axis in the configuration file
If you are using the GLCD you are done with the wiring. The "JOG" Z axis function on the GLCD will server to move the Lift Table up and down.
Adding UP/DOWN buttons
If you are not using the GLCD and/or want discrete control buttons
- Connect UP/Down buttons to spare input pins on the Smoothie. I used P1.22, P.23. They can be found on the smoothie board next to the Ethernet connector on JP32. The buttons must switch to gnd.
- Program the configuration file to use the input switches
Example switch configuration modules:
Up switch
switch.zplus.enable true
switch.zplus.input_pin 1.22^
switch.zplus.output_on_command G91_G0Z10_G90
Down Switch
switch.zminus.enable true
switch.zminus.input_pin 1.23^
switch.zminus.output_on_comman
BOM
UP/Down buttons: any NO momentary button will work.
Lift Table Power
I don't know exactly what the power requirements for the lift table is but I do know that it is more than 1 ampere @24VDC. The lift mechanics put quite a load on that stepper.
If you are using the LPS to provide 24VDC to your Smoothie its capacity is only 1 ampere.
It is therefore possible that you could be overloading the 24VDC supply. Measure the current and voltage when running your Z table configuration to verify you are not overloading the supply. There are no fuses on the 24VDC from the LPS so if you exceed the load it will damage the internal regulator and you will need to repair the damage or purchase a new supply. (I added DC fuses in my power design)
To minimize power consumption insure that the table mechanics are aligned properly and moving smoothly. Mine had a bent shaft (LO replaced) that cause increased current draw.
Wiring diagram
Go the K40-S BUILD INDEX above to get the latest schematic.
No comments:
Post a Comment