Background
The Smoothie supports a graphic display panel which is connected via an adapter board and ribbon cables to the Smoothie motherboard.
The starting point for info: http://smoothieware.org/panel
The K40-S BUILD INDEX with schematics
Donate:
Please consider donating (button to the right of this post).
Your donations help fund additional research, tools and parts that I will return to the community as information and how-to's.
GLCD panel Build
The panel and its shield is pretty straight forward to build and install.
- Shield build
- Install the missing pins
- Install the 5VDC regulator
- Plug the shield onto the smoothie
- Install the 2 shield-to-panel cables making sure they are correctly connected
- Check the configuration file to assure the panel is enabled and configured correctly
Make sure that you don't make these mistakes:
Configuration
At the time of this post I was running "firmware-cnc"
Enable the panel module and un-comment what is needed for this display.
Link is here: http://smoothieware.org/rrdglcdadapter look for the configuration setting for the GLCD.
Enable the panel module and un-comment what is needed for this display.
Link is here: http://smoothieware.org/rrdglcdadapter look for the configuration setting for the GLCD.
Change the Rotary Dials Rotation Direction & Step Resolution
:
In the config file under panel swap the encoder A and B pin #’s with each other.
To change the step resolution; "That's called panel encoder resolution, it's not in the default smoothie config file, but you can add that line in. The value you want is 4, instead of the stock value 2."
In the config file under panel swap the encoder A and B pin #’s with each other.
To change the step resolution; "That's called panel encoder resolution, it's not in the default smoothie config file, but you can add that line in. The value you want is 4, instead of the stock value 2."
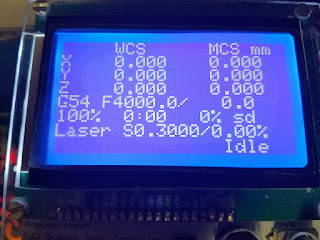
Ready to run, looks like this
Smoothieboard GLCD Shield
- http://shop.uberclock.com/collections/smoothie/products/smoothieboard-glcd-shield
- Sheild Schematics and such
- Assy and connections to Smoothie
 |
| GLDC sheild without regulator |
 |
| Mounted GLDC shield with regulator installed |
 |
| Note: Additional pins must be added to the Smoothie to accommodate the shield. Install pins in the RED circles. |
 |
| Cable orientation. I labeled my shield and the cables so that they don't get reversed. |
RepRap Smart Full Graphics Controller:
RepRap Smart Full Graphics Controller
Smoothie board and display mechanical:
In case you want to model the packaging of the display and the smoothie here are some 3D models for SketchUp:
Enjoy and leave suggestions as comments
Maker Don.


No comments:
Post a Comment