High Voltage Transformers are Dangerous
OPENING AND EXPOSING THE INTERNALS OF THIS LASER POWER SUPPLY (LPS) IS DANGEROUS!
LIFE THREATENING VOLTAGES ARE PRESENT IN THE K40 HIGH VOLTAGE LASER POWER SUPPLY!
I do not recommend opening the LPS and trying to perform a repair. A typical LPS can cost only $70 -80 and a High Voltage Transformer (HVT) is $20-30 the difference it not usually worth exposing yourself to these voltages and identifying a dead HVT is at best uncertain.
YOU PROCEED FROM HERE AT YOUR OWN RISK!
Other related posts are:
Donate:
Please consider donating (button to the right of this post).Your donations help fund additional research, tools and parts that I will return to the community as information.
For other information on the K40-S build use the K40-S BUILD INDEX with schematics
You cannot test the secondary circuit of these transformers without a tester. This test attempts to simulate the switching circuit on the primary as a meas of detecting an open secondary.
I am also working on a more definitive DIY HVT tester but this test can be done with household items so I thought I would throw it out there.
If you want to donate leave a comment.... or get to me at +Don Kleinschnitz


Enjoy and comment
Maker Don
Testing a K40 Laser Power Supply High Voltage Transformer
A common failure item in a K40 is the HVT in the LPS. This transformer is what converts line voltage to up to 20,000 VDC and when applied to the laser creates ionization. This HVT has a primary, and secondary. Although not yet verified we believe it has a HV diode and ballast resistor on the secondary. These transformers are potted so the internals are not exposed.You cannot test the secondary circuit of these transformers without a tester. This test attempts to simulate the switching circuit on the primary as a meas of detecting an open secondary.
I am also working on a more definitive DIY HVT tester but this test can be done with household items so I thought I would throw it out there.
Donate your dead LPS and HVT to a cause
I am using dead power supplies to test ways to diagnose and identify what is causing these supplies to fail. Please donate your dead LPS or HVT to this cause and help the community get to a more reliable system.If you want to donate leave a comment.... or get to me at +Don Kleinschnitz
Testing Procedure
Note these instructions are for the HVT that has a 3 pin connector. I will update this post later for other types. The theory of the test is the same for them all.
HVT's are difficult to test because the HV diode in the secondary has a high forward voltage. What this means is that to find out if the secondary is shorted a large voltage is needed. An ohm meter is of no use and will read an open. The primary can be tested with a DVM.
Step 1: Unplug the machine and wait 1/2 hr.
Then with an insulated wire ground the anode of the laser tube. To ground the anode tape one end of a wooden dowel to a wire whose end it bare and connect the other end solidly to earth ground. Grip the insulating dowel with one hand and put the other behind your back gripping nothing. Touch the bare-wire end of the wire to the anode, an arc may occur.
Step 2: Remove the LPS from the machine.
This means that you will have to remove the large HV wire from the anode of the Laser. With all wires disconnected from the supply remove the cover of the LPS. If your HVT has a plug connecting it to the PCB, unplug it. You can leave the HVT mounted or dismount it to test it depending on the type of HVT. There are two general types of HVT one with a connector and one mounted directly to the PCB. The second type will require removal of the HVT from the PCB.
This post outlines HVTtypes: LPS Repair & Test
This post outlines HVTtypes: LPS Repair & Test
Step 3; Test The Primary
With an DVM set on a low ohms scale read the resistance across the black and yellow wires in the 3 pin connector. It should be nearly 0 ohms. If not ... donate it to me :)! its dead.
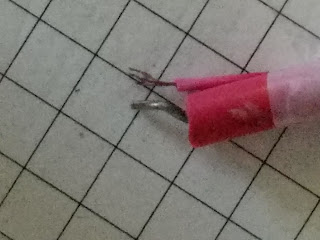
Step 4: Create a Spark Gap
Connect a wire to the red wire in the 3 pin connector. Tape the red HV lead to this wire. Do not electrically connect these wires together. Rather, create as small a gap as possible between these wires. This is our spark gap and will indicate if we can develop HV in the secondary.

Step 5: Wire up the primary
Connect one side of a 9V battery to the black wire in the 3 pin connector. Connect one end of a wire to the yellow pin on the 3 pin connector leave this end free.


Step 6: Test the HVT
Rapidly touch the wire that is connected to the yellow pin on the 3 pin connector to the other terminal of the 9V battery. An arc should occur across the gap you created in step 4. If it does not ... donate it to me :)! its dead. If it does arc your HVT MAY or may not be good.
About the HVT Test
The validity of this test has not been completely verified. Although this test should show if the secondary is inoperable it does not determine if the secondary can output the correct levels or quality of voltage. It also may not detect a shorted HV diode. If this test fails it is highly likely that the HVT is dead. If it does not fail it may mean that the HVT MAY be bad and MAY not :(.
To this point I do not have a bad HVT to verify this test with. If it works for you please leave a comment.
Enjoy and comment
Maker Don
Really ,This is a wonderful post. I enjoyed the information lot. I will bookmark this page. Thanks for sharing this important information.
ReplyDeletefiber laser marking plastic
is it not easier just to leave the LPS alone and test with a packing peanut tied onto on a dry piece of sewing thread, with the machine running and in cutting mode then dangle the peanut slowly towards the HV connection on the tube and if it starts to swing and attract to the HT lead then you know the flyback transformer is generating high power to initiate the arc so showing the tube is at fault ?
ReplyDelete